Thursday, 11 December 2014

Gluten Free Gingerbread Cookies

Normally I am too lazy and hungry to get past the cookie dough stage in baking, but seeing as Christmas is nearing and I have this weird need to be motherly I wanted to try my hand at a holiday favourite. Gingerbread cookies to me taste like happiness. They remind me of the white snowy winters we would have living overseas and snuggling up by the heater Christmas morning. Here, the sweltering heat will more likely cook them before making it to the oven and you're more likely to wash them down with a cold beer than a mug of hot chocolate but they still represent Christmas to me. 


Seeing as my family and everyone else these days are coeliacs I wanted to trial a gluten free gingerbread recipe. A lot of gluten free biscuits I find however are either too dry and fall apart or you have to mix ten types of rice, corn or almond flour together. As mentioned, I am lazy. So I searched around for a recipe that pretty much just substituted the one flour ingredient but still maintained some type of texture. 

I thought I would also share a small review of this recipe after making and tasting them so you don't have to waste your time making cookies that crumble like dust. These don't, FYI. 

Ingredients
  • cups gluten-free flour
  • teaspoon baking powder
  • 1/2 teaspoon bicarbonate of soda
  • teaspoon cinnamon
  • teaspoons ground ginger
  • pinch salt
  • egg
  • 125 g butter
  • 1/4 cup golden syrup
  • 1/2 cup brown sugar


Method
  1. In a bowl cream the butter and brown sugar
  2. Add golden syrup and egg and mix till combined
  3. Ina separate bowl sift together all the dry ingredients, then add to the wet ingredients
  4. Mix together and then refrigerate for 1 hour 
  5. Remove dough from refrigerator and place onto a floured surface and knead lightly
  6. Roll out to 5mm thickness then cut into shapes using cookie cutters
  7. Bake in 170 degree celsius oven for approx 15 minutes or till well browned 
  8. Leave to cool on trays for 5 minutes then transfer to cooling racks
  9. When cool ice with icing 

Review & Thoughts
  • I thought I would need to tweak a few things to get the nicest texture or flavour but honestly this recipe is so simple and delicious there's no changes required; just a couple tips I wish I knew before making them. 
  • I would knead for the shortest time possible as the dough warms up extremely quickly then its hard to transfer onto the baking tray. 
  • And while one tray is baking, I would recommend putting the unused dough back into the fridge to harden back up so the next shape cutting is easy. 
  • For chewy cookies, cook for about 12-13 minutes. For harder, cook for the recommended 15-17 minutes or until well browned. 


Friday, 5 December 2014

DIY: Up-Cycle Your Old Greeting Cards

For a lot of the birthday, christmas, valentine and other greeting cards I have received over time I tend to hoard and box away for sentimental reasons. I never refer to them; only re-reading them once a decade when I happen to stumble across them during another house move. I feel that if I threw them away, I would be discarding the well wishes that were written with care by those who I love. 


A couple months ago I was perusing the interweb as I do, and came across an incredibly sweet and creative article post on Good Housekeeping about different 'things' to frame to create your own wall art. After our engagement, wedding, pregnancy announcment and birth, we had accumulated an extensive collection of cards. Rmemebering the post, I decided to put them to good use. 

I thought I would share a brief How-To to obtain a very unique piece of art in your house and show you what I ended up doing in my own home. For the purpose of the tutorial, I made it small-scaled but depending on how many cards you have, it can be as small or as large as you like. 


The first step is to choose a shape to cut out. This can be anything; a butterfly, star, heart, geometric shapes, flower, animal, etc. I chose a heart. I used a post-it note and drew an outline of the shape/template on it so that I could simply stick on top of the card I was using. For a heart, I folded the post-it over so that I was symmetrical. 


Here, I simply cut out the hearts without having to draw ontop of the cards. This ensures the template stays in place. Do this for as many as you need. If the 'stickiness' wears off, copy the shape onto a fresh post-it. 


Choose a frame size that can accommodate the number of shapes you have. As mentioned, for this tutorial I had only two so I used a small frame. For a backing colour I simply applied a pink sheet of paper. The glue is to stick them to the paper so they don't move while you are adjusting everything (a lot more helpfull with a larger frame)

The End Result
It's not very hard or high tech to create and if anything it's a lovely rainy day craft idea. If you have any simple craft ideas of your own that you think I would enjoy please let me know or leave a link! Being on maternity leave gives me a little more time to tinker. 

This is what I had created a few months ago out of our wedding cards:

I also included our wedding invitations in two of the hearts and a picture of Eddie and myself. 


Saturday, 29 November 2014

1 Week Post Partum


Firstly, I wanted to point out this is not a guide of what you should or should not do post birth to lose weight or get back your body. Each mother's speed of recovery depends on several factors such as weight gained during pregnancy, how active you are, genes, if you breastfeed and if this is your first baby. I simply want to share my experiences and recovery so far. 

40 weeks pregnant 

Over the course of the 9 months I gained a total of 12kg. 48 hours after giving birth, I weighed myself and found that I had lost about 6.5kg from the birth. As of today, I lost a further 1.5kg. Most of this loss I attribute to genes. There are however a few things I do to ensure I am getting the most out of my recovery:

Exercise

I have not done any rigorous activity. The most I do is fold laundry and walk around in circles nursing Elliot to sleep. Before I can start any sort of work out I need to make sure my body has healed. 

Because your abdominal muscles split during pregnancy and because I had perineal stitches, throughout the day I do my pelvic floor exercises while simultaneously doing the following to aid in closing the gap:
  •  Keep your lower back flat
  • Breathe out and draw your belly button back towards your spine. Your lower back shouldn't flex or move. 
  • Hold this position and breathe lightly. Count to 10. 
  • Relax and repeat up to 10 times per set
  • Do 10 sets, as many times per day as you can. 

Elliot's sleeping is quite scheduled so I am able to get about 5 hours a night and about 2-3 hours in the day. 

Diet

I keep myself extremely hydrated. I drink about 4 litres of water a day - especially when I am breastfeeding. Which, itself speeds up my metabolism.

My diet has not changed much since before giving birth. See details of my daily diet here

Products

I looked into getting one of those belly bands or recovery shorts but I thought their price was a little too outrageous for my liking. I shopped around as I always do and found that you can get almost the equivalent on Ebay for a fraction of the price. I also ended up purchasing leggings that I actually saw on a TV infomercial. They are called the Slim and Tone Leggings. Learn more about them here


One Week Post Partum

I found that these leggings aided in the contracting of my uterus back into shape and has helped alongside my exercises to mend my abdominal muscles. I highly recommend them!

For my skin itself, I try to keep it as hydrated as possible. I moisturise after each shower - no particular cream at the minute and alternate between bio oil and moisturiser. In the shower however I like to use Frank Body Scrub a couple nights a week. I find this really does invigorate my skin and even though I didn't get stretch marks, I have noticed a difference in my skin elasticity. 


For now, I am not looking to get my 'body back' or to try and get stuck into working out. I am happy getting to know my new baby and when I feel like it, I may start with walking then later on post an exercise routine when my abs are healed. 


Wednesday, 26 November 2014

The Bulldog & The Baby


Anyone bringing a baby home for the first time stresses that their existing furr-baby will not take to the newest arrival. For me, I wasn't worried that Emma, our 18 month old Bulldog, wouldn't accept Elliot; but rather than she would be so excessively excited to see her that I would have to keep them separated in case Emma bulldozed Bub with 27kg of pure love. 

Most people who have met Emma didn't have confidence that she would a) accept the baby because she is so fiercely protective of me or b) be able to be gentle enough to be near her. To be fair those are more than valid assumptions. Emma is head strong, rough, stubborn, never listens, hates strangers until they become friends with some convincing and if you aren't a dog-person, she isn't going to be a person-dog. 


Our plan when bringing Elliot home was to hand Emma over to my sister for two days as Emma is such a handful and so demanding. Hubby and I always said that we expected caring for a baby would be a breeze compared to what we have to deal with Emma and that we may need a few days to decompress and cope without her barking at us because we aren't with her 100% of the time anymore. 

During my early labour, Emma stayed by my side even resting her head on my belly during contractions. When my husband returned home briefly in the morning after we had Elliot at the hospital  to feed Emma, she sulked by the door unmoving waiting for me to come home. When I did a few hours later, she was a different dog. She was calm when greeting me, didn't jump and could tell that the little bundle I was holding was her new little sister and she was now Elliot's protector too. 

The Introduction

When we walked into the gate at home I held the baby but greeted Emma the same as always by talking happily to her. 

Before she got to see the baby, we tested her restraint by holding a swaddle to her nose that had the baby's scent on it and let her get a good whiff. 

Inside the house, because she had been calm so far, I sat on a seat and allowed Emma to sniff the baby's wrapped feet and bottom for a few minutes. 


Over the following days, I allowed the dog to get closer and closer to her in various situations such as in her rocker or sitting next to me while Elliot fed.


She would follow the baby around the house, very curious of us changing her, feeding her and especially the little noises she made. 

So far they have been a dream together. Emma worries when she hears the baby cry, likes to check on her while she sleeps, and loves to sit close to her for reassurance. She is even included in tummy time because she is so well behaved.


We set boundaries with Emma like not being allowed to bark at night, no paws on the baby, no getting close to her head or face, we don't leave them alone together at all and she's only allowed in the baby room when we are. 

Every dog of course will be different and you have to trust that they will be ok. I never had any doubt that Emma wouldn't be the best big sister. 


Sunday, 16 November 2014

Sweet Potato & Fetta Frittata

I tried this frittata for the first time at my baby shower the other week. It was one of the many delicious little finger food platters that was kindly prepared by my family and I was so impressed by it in fact, I consumed most of the plate myself then made a mental note to track down the recipe so I could make it later. 

Original recipe found in this cook book

Last night I did just that for dinner and I'm so excited I have left overs for breakfast/lunch today because I can tell you; this is one of the best tasting things I've eaten in a while. The original recipe uses less sweet potato and instead if fetta it has goats cheese, but I like lots of veggies and prefer the taste of fetta so I tweaked it to suit my tastes. You can make either versions or even change flavours to suit yourself but either way it's super easy, quick, yummy and gluten free. 

See below for my step by step guide to be eating pumpkiny-goodness in under an hour. 

Ingredients
  • 500g sweet potato, cut into 2cm chunks
  • 6 eggs, lightly beaten
  • 410g tin creamed corn 
  • 2 cloves garlic, crushed
  • 100g fetta cheese, crumbled
  • 1/2 tsp salt
  • 1/2 tsp black pepper


Method
  • Preheat oven to 180 degrees celsius. Grease a 16cm square baking dish. 
  • Place chopped sweet potato in a microwave safe bowl and cover with cling film. Poke a few holes for steam to release and nuke for 5-6 minutes on high or until just tender - do not overcook. Drain and allow to cool slightly. 
  • Place the egg, creamed corn, garlic, salt and pepper (to your own preference) in a large bowl and mix together well. 

  • Combine the sweet potato and fetta cheese in the baking dish, then pour the egg mixture over the top. Move the dish around so everything is evenly distributed.

  • Bake for 25-30 minutes or until firm. (I cooked longer because my dish was smaller so frittata was thicker)
  • Leave for 5 min before serving. 

I paired this with a salad for dinner and then had with sliced avocado and bacon for breakfast the next day. This can also be served cold or room temperature. 

Please feel free to leave a comment if you try this out or if you have a frittata recipe of your own I should cook myself!!


Pretty Bowtique Giveaway Winner

Thank you to everyone who participated, shared and followed Pretty Bowtique in support and to win those lovely headbands!

The lucky winner is instagramer @carlymhussey who will be contacted for shipping information. 

Don't forget the details to purchase your own gorgeous headbands from Danielle's store are found in the original blog post.

Any questions or concerns, please do not hesitate to contact me. 


Wednesday, 5 November 2014

Little E's Nursery

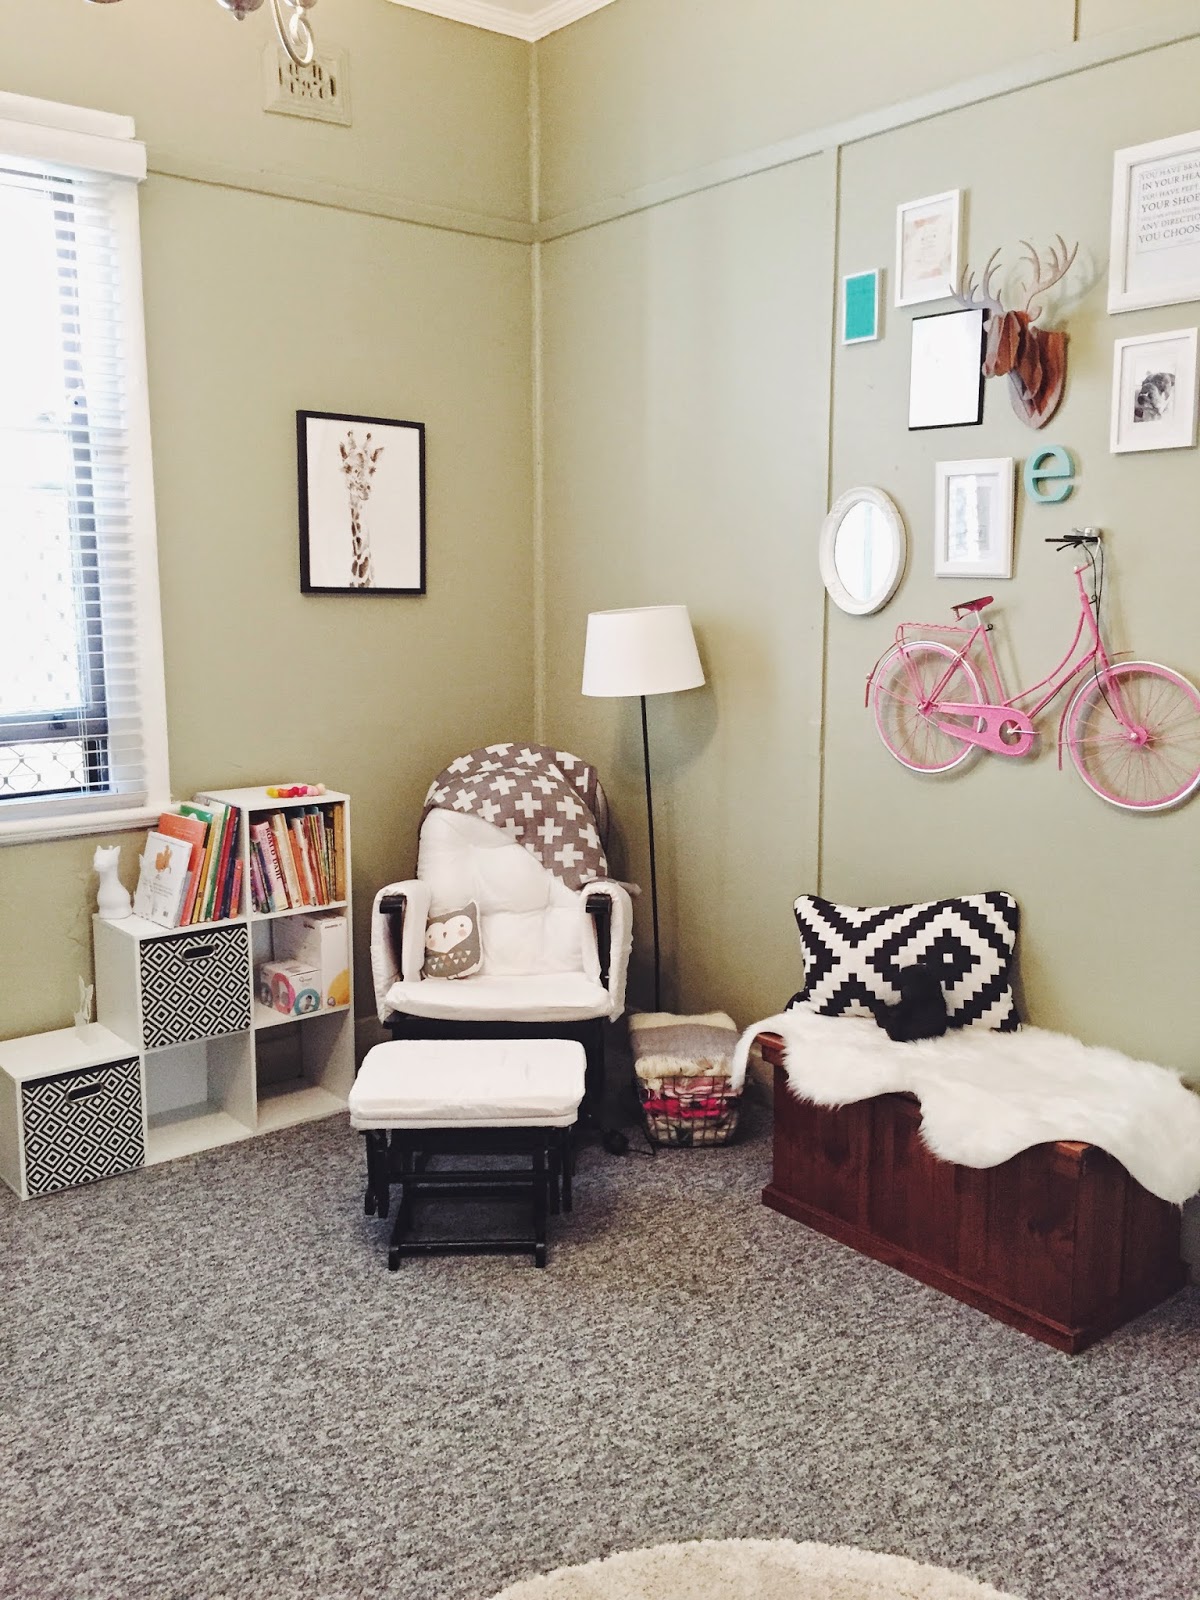
I didn't decorate the nursery with a set style or theme in mind. Like every other room in the house, I started with the major items out of price and convenience and go from there mixing and matching colours and textures to create an ever-evolving style. We rent a very old house at the minute that has an old-charm feel so I contrast and highlight this aspect throughout with industrial-style pieces, modern furnishings and an overall eclectic approach. It isn't a refined or glossy style, but it matches well with the old house. Most items, not specific to just the nursery are either second hand, refurbished, DIY, reclaimed or bought online.

Also, as we rent, wall colours and carpets are as-is but we are allowed to hang whatever we like!
The cot and change table are Boori brand from their Country range. I got the two for $400 second hand on Gum Tree with their original retail price at a combined $1100. The only thing 'wrong' with them are two tiny little teeth marks on the railing edge of the cot where a baby has obviously taken out their teething frustration. The cot is currently being used as a hospital bag storage area as Baby E will be in a bassinet in our bedroom to start out. I opted to buy my own mattress and change mats new.

The mobile hanging above was also one of my DIY projects which only cost about $6 to make. 


Nappies, wipes, creams, breast pads and travel items are stored under the change table for convenience and accessability.


The opposite corner hosts our feeding and reading area. Both the shelving unit and the rocker were bought new online heavily discounted from http://www.oo.com.au (One of my fav discount sites) Theres a wire basket, like the ones under the change table, filled with baby blankets and most of her books were also either bought online or second hand from a little book boutique in town. 

The toy chest was also found on gumtree.com for only $40 and is made of very good quality heavy wood. (Sorry don't know the specifics) This is currently filled with future toys, gifts, clothes and nappies that were received at the baby shower that will not be of use in the next 12 months. (But still very appreciated and necessary)


We call this the bicycle wall. Its a mish-mash of frames, textures and colours but I love it to bits. Theres a few frames missing in this picture and a few empty ones revealing her name and for future baby pics. The bike was not handmade or on discount but I HAD to have it. Cost about $120 from a gift store but in my opinion is the best piece in the room.

And of course Emma made it onto the wall of fame. 


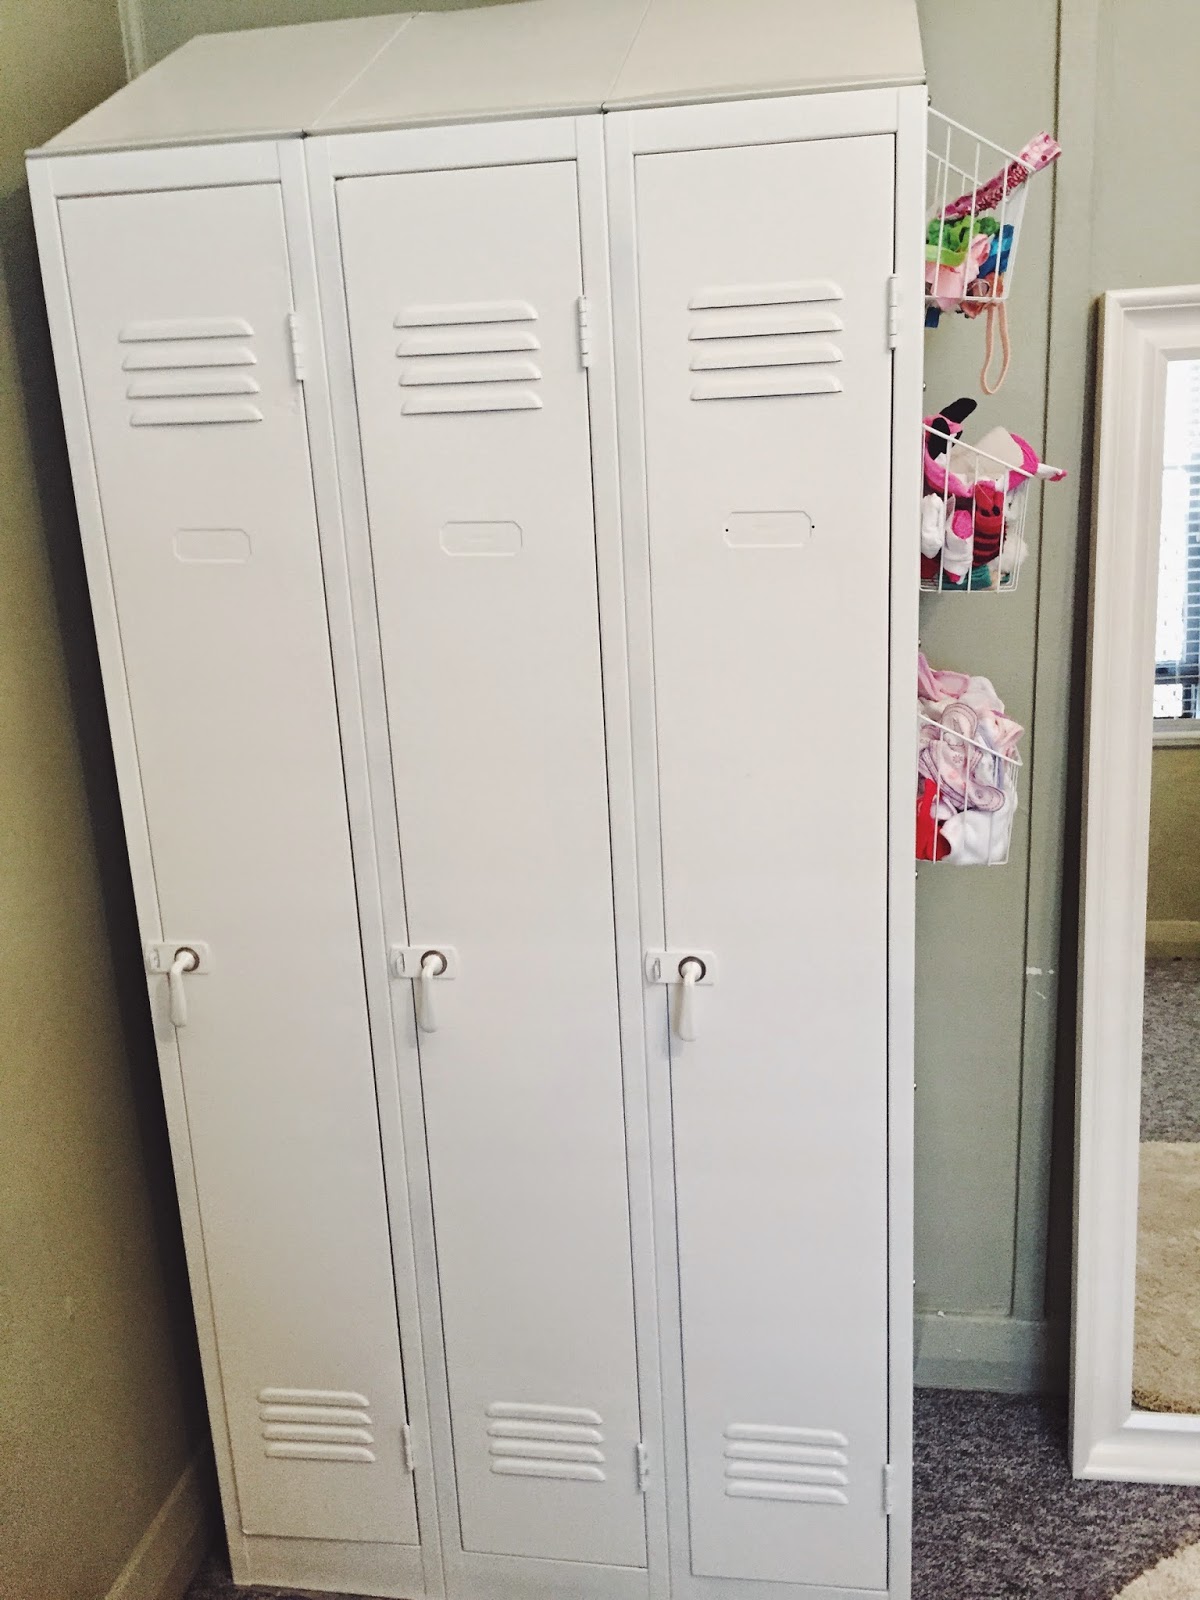
The third and final corner is Little E's closet. Or rather, her lockers. I bought these on gumtree for $100 about 18 months ago. At the time, I didn't know what I wanted them for, but they fit in with our industrial appreciation. They were originally grey, red, blue and yellow and were riddled in rust and almost falling apart on the inside. Once we fell pregnant I knew I wanted these as the baby closet but they needed a good once-over.

This 'once-over' included months and months of sandblasting, grinding and prep work by my husband and they were spray painted by him and my father over a weekend. The results however speak worlds for how much work he put into them. Of course he resents me for the amount of time and money that actually went into them, but I know he's proud. Somewhere.. deep deep down.

The baskets on the side were bought for a few dollars from Kmart and bolted on after and hold hair bows in the top one, socks/mittens/hats in the middle and bibs in the bottom basket.


This is how her clothes are organised. Left locker is all hanging items sized 0000 to 9 months. Middle has singlets, t-shirts, pants, sleep sacks and shoes with the locker on the right a few 1 year old items and spare hangers.

With her still not here yet and having never organized a nursery before of course items and placements will change and as she grows, the clutter and decorations will enivitably evolve but for now we are happy with her little room and proud of what we have to give her.


Thursday, 30 October 2014

Pretty Bowtique Giveaway!


If you have ever read my maternity fashion blog post or follow me on Instagram, you will know that I am obsessed with a good accessory. So much so in fact that I have teamed up with the lovely Danielle from Pretty Bowtique to share my current obsession!

I first spotted her store on her Instagram feed of extremely adorable kids' hair bows, clips and even baby moccasins. (FYI ordered mine today already) This lead to me stalking her website and even having the ladies in the office help me make the hard choice of not buying everything on the site. Biggest appeal to me what that not only are they great quality, meet the 'Laura-price-range-criteria' but she also provides flat rate international shipping of only $10 no matter how big the order and no matter where in the world. 

I wanted to share these amazing products so much we've teamed up together to have an International Giveaway with two of her gorgeous Knotted Headbands being the prize shown below:


It's pretty simple to enter: 
  • Follow or already be following @prettybowtiquetoo and @lorakayte on Instagram
  • Like @prettybowtiquetoo's latest pic and re-gram the competition post picture from her page or mine with the hash tag #prettybowtiquegiveaway and tag @prettybowtiquetoo and @lorakayte
  • Giveaway will run for two weeks closing midnight November 13th (AEST)
  • Winner is picked at random and at the discretion of Pretty Bowtique and announced on both pages and this blog on the 15th of November
  • All links and contact info listed below

Useful Links and Contact Info 

Pretty Bowtique 
Instagram: @prettybowtique
Email: admin@prettybowtique.com


Laura B
Instagram: @lorakayte
Email: bulldogsandbabes@gmail.com


Head to her website now regardless of the giveaway because I swear those baby moccasins and matching headband will make you melt.


Please note this competition has now closed and the winner has been announced. Thanks!